Accounts
Organize your finances with separate accounts. Use Personal for individual tracking, Shared for family budgets, and Business for company expenses. Invite members with role-based access control.
Overview
The app supports multiple accounts to separate different financial contexts. Each account has its own expenses, income, budgets, and wallet.
Account Types
| Type | Icon | Purpose |
|---|---|---|
| Personal | Person icon | Individual expense tracking |
| Shared | People icon | Family or group budgets (e.g., “Family”) |
| Business | Briefcase icon | Company or team expenses (e.g., “MiCode”) |
| Investment | Trending-up icon | Track investment portfolios and assets |
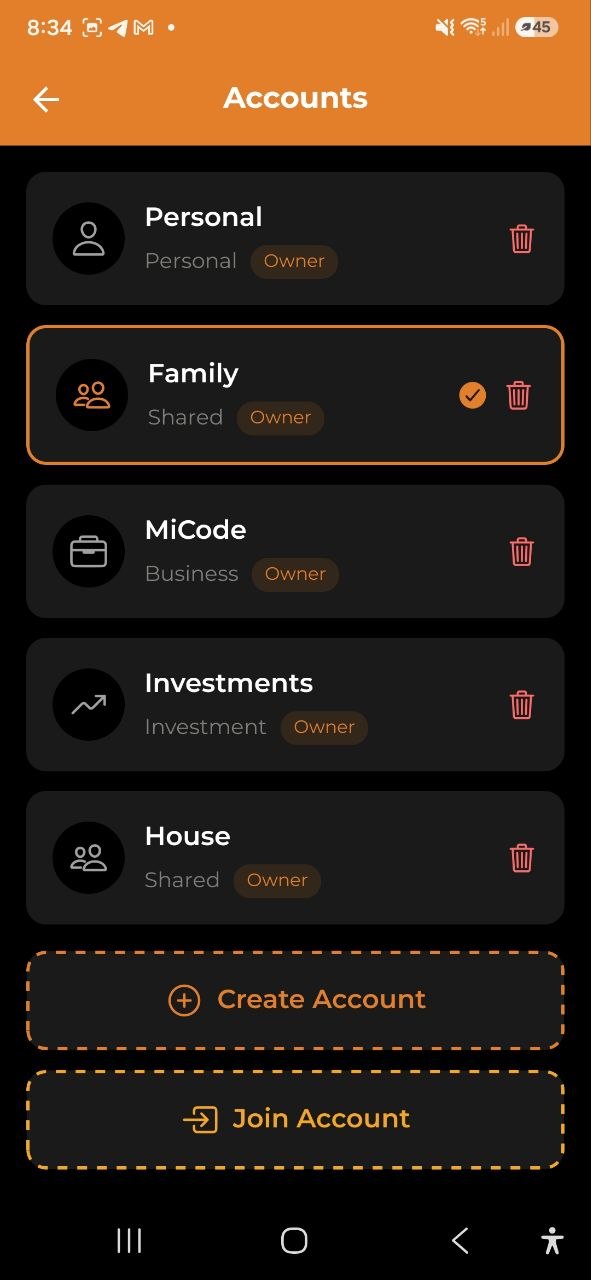
Each account shows its type and your role (Owner, Editor, or Viewer).
Switching Accounts
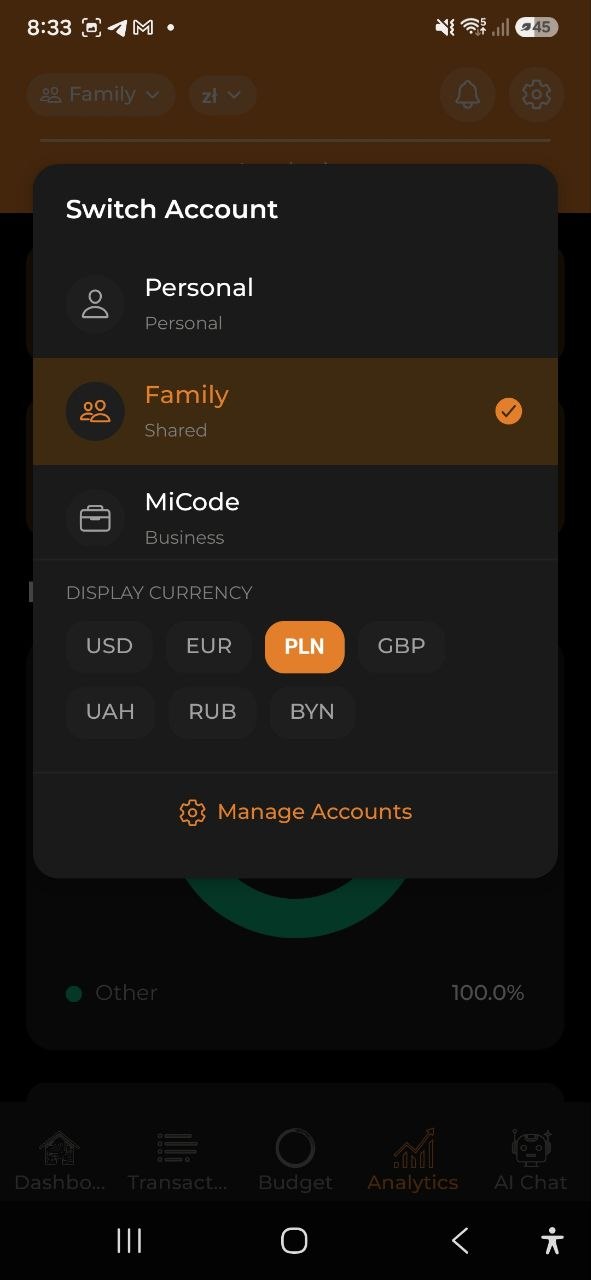
- Tap the account name in the top-left corner of any screen (e.g., “Family”)
- The Switch Account dropdown opens showing all your accounts
- Tap the account you want to switch to
- The active account is marked with a green checkmark
- All screens update to show the selected account’s data
Tap Manage Accounts at the bottom of the dropdown to go to the full account list.
Changing the Display Currency
Change the currency that all your totals are shown in — from any screen, without opening Settings.
On the home screen, the fastest way is the dedicated currency pill next to the account name — tap it and pick a currency. On other screens:
- Tap the account name in the top-left corner of any screen. The current currency symbol appears next to the name (e.g.,
Personal · $). - In the menu that opens, find the Display currency section below your account list.
- Tap the currency you want (USD, EUR, PLN, GBP, UAH, RUB, BYN).
- Every amount in the app is instantly converted to the selected currency at the latest exchange rates.
This is your personal display currency and is saved for next time. It only changes how amounts are shown — your transactions keep their original currencies. Each member (including Viewers) can pick their own display currency.
Creating an Account
- Go to the Accounts list (via Manage Accounts or from Settings)
- Tap Create Account
- Enter an Account Name (e.g., “My Budget”)
- Select the Account Type: Personal, Shared, Business, or Investment
- Select the Currency for this account
- Tap Create
Note: Free plan allows 3 accounts, Pro allows up to 5, Business allows unlimited accounts.
Joining an Account
If someone has invited you to their account:
- Tap Join Account on the Accounts list
- Enter the invitation code you received
- Tap Join
- You’ll see a success message: “Successfully joined the account!”
- The account now appears in your account list
Account Settings
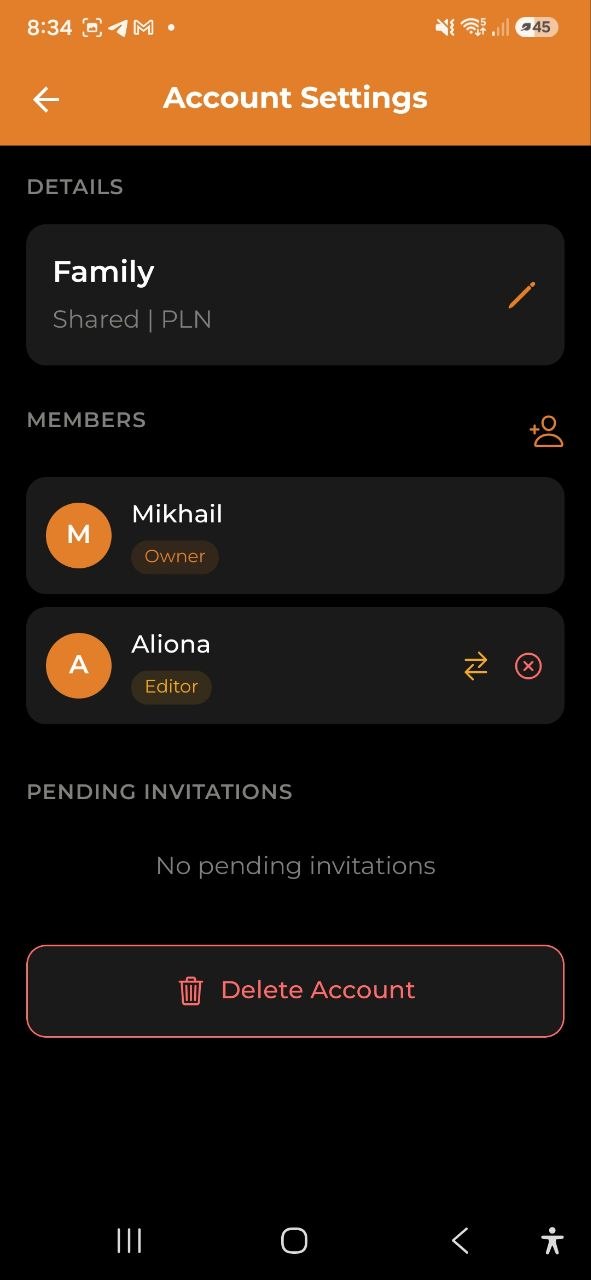
Tap any account to open its settings:
Details
- Account name (editable by Owner)
- Account type and currency (display only)
Members
- List of all account members with their roles
- Each member shows: avatar, name, and role badge (Owner, Editor, Viewer)
Inviting Members
- Open Account Settings for the account
- Tap the invite icon (person+ icon at the top-right of the Members section)
- Choose invitation method: - By Email — enter the person’s email address, select their role (Editor or Viewer), tap Send Invitation - By Link — a code is generated that you can share. Tap to copy or share via messaging apps
Managing Members (Owner only)
- Change Role — tap the role-change icon next to a member to assign a new role
- Remove Member — tap the remove icon to remove a member (with confirmation)
Pending Invitations
- View invitations that haven’t been accepted yet
- Cancel Invitation — revoke a pending invite
Roles and Permissions
| Permission | Owner | Editor | Viewer |
|---|---|---|---|
| View expenses & income | Yes | Yes | Yes |
| Add/edit expenses | Yes | Yes | No |
| Add/edit income | Yes | Yes | No |
| Create/edit budgets | Yes | Yes | No |
| Manage members | Yes | No | No |
| Edit account settings | Yes | No | No |
| Delete account | Yes | No | No |
Role Descriptions
- Owner — full control over the account, can manage members and settings
- Editor — can add and edit expenses, income, and budgets
- Viewer — can only view data (read-only access)
Deleting an Account
- Open Account Settings
- Scroll to the bottom and tap Delete Account
- Confirm the deletion
Warning: Deleting an account permanently removes all its data (expenses, income, budgets). This action cannot be undone.
Leaving an Account
If you’re a member (not the Owner) of a shared account: 1. Open Account Settings 2. Tap Leave Account 3. Confirm — you’ll be removed from the account
Telegram Account Switching
When using the Telegram bot, you can switch accounts in two ways:
- Manually — send
/accountand tap the account button - Automatically — mention an account name in your message (e.g., “Show expenses in Family”), and the AI will query that account for the current request
The automatic detection does not change your default account — it only applies to the current message. Use /account to permanently switch.
FAQ
-
Q: How many accounts can I have? A: Free: 3 accounts, Pro: up to 5, Business: unlimited.
-
Q: Can I transfer ownership of an account? A: Currently, the account creator is always the Owner. Contact support for ownership transfers.
-
Q: Can I see who added an expense in a shared account? A: Expenses in shared accounts show which member created them.
-
Q: Can I use different accounts in the Telegram bot? A: Yes. Send
/accountto switch your default account, or simply mention the account name in your message for one-time queries. See Telegram Bot for details.
See also: Settings | Subscription Plans