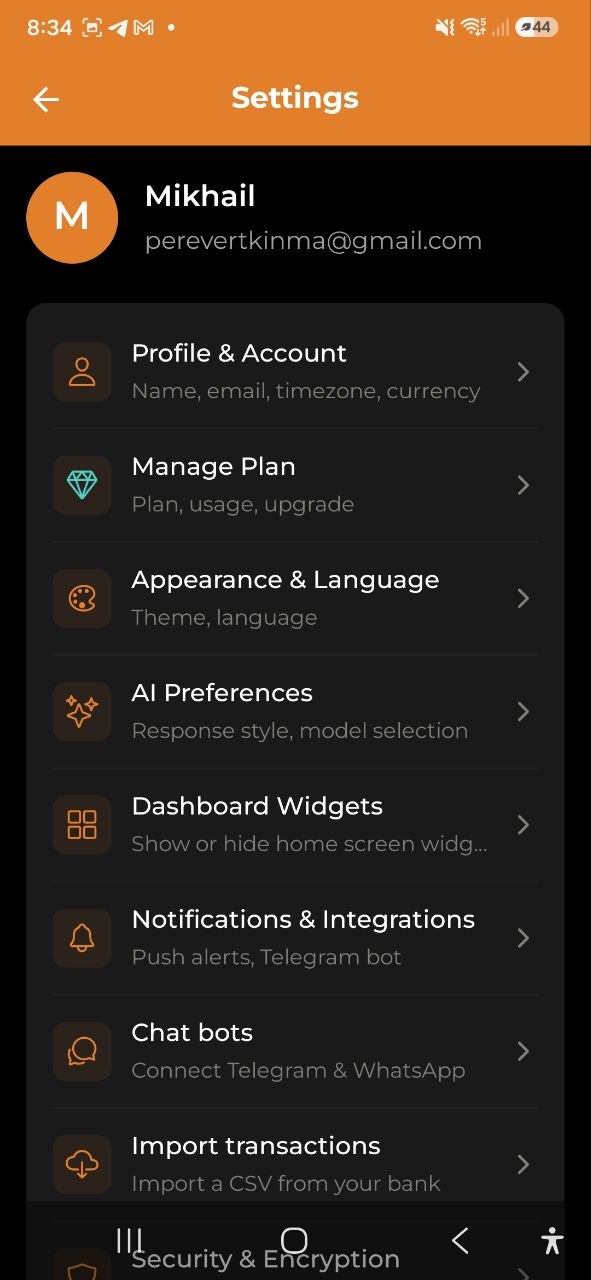
Settings
Customize your profile, appearance, dashboard widgets, notifications, and data sync. Change your language, currency, theme, and manage your account preferences.
Overview
Access Settings by tapping the gear icon in the top-right corner of any screen.
Settings are organized into categories. Tap any category to open its dedicated screen:
| Category | What’s inside |
|---|---|
| Profile & Account | Name, email, timezone, currency |
| Manage Plan | Current plan, usage, upgrade options |
| Appearance & Language | Theme, language |
| AI Preferences | Response style, model selection |
| Dashboard Widgets | Show or hide home screen widgets |
| Notifications & Integrations | Push alerts, Telegram bot |
| Security & Encryption | End-to-end encryption setup |
| Wallet | Balances, debts, initial balance |
| Data & Reports | Sync, email reports, backup & restore |
| About | Version, help, support, legal |
Profile & Account
- Avatar — displays your initials with a colored background
- Name — your display name. Tap the pencil icon to edit
- Email — your account email. Tap the pencil icon to start an email change (see Change email address below)
- Timezone — tap the pencil icon to change. A searchable picker appears with 90+ timezones (e.g., “Europe/Warsaw”)
Currency
Select your default currency by tapping one of the currency chips:
USD | EUR | PLN | GBP | UAH | RUB | BYN
The selected currency is highlighted. This sets the default currency for new expenses, income, and Dashboard displays.
Change email address
To change your account email:
- Go to Settings → Profile and tap the pencil icon next to your current email address.
- On the Change Email screen, enter your new email address and your current password.
- Tap Send verification code — a 6-digit code is sent to the new address.
- Enter the code in the next step and tap Confirm email change.
Your email is updated immediately and new login tokens are issued. If you close the app before entering the code, the next time you open the Change Email screen it will resume at Step 2 for up to 30 minutes.
Note: The verification code expires in 30 minutes. Tap Resend code to go back to Step 1 and request a new code.
Appearance & Language
Language
Choose from 8 supported languages:
| Code | Language |
|---|---|
| EN | English |
| RU | Русский |
| UA | Українська |
| PL | Polski |
| ES | Espanol |
| FR | Francais |
| DE | Deutsch |
| BY | Беларуская |
Tap a language chip to switch. The interface updates immediately.
Appearance
Choose your theme:
- System — follows your device’s light/dark mode setting
- Light — always use light theme
- Dark — always use dark theme
AI Preferences
AI Response Style
Control how the AI communicates with you across all AI features (Chat, Stories, Insights, Fat Finder, Goals):
| Mode | Description |
|---|---|
| Simple | Plain language, no jargon — great for beginners |
| Balanced | Mix of simple and technical — the default |
| Expert | Financial terminology, detailed analysis — for professionals |
Tap a chip to switch. The change applies immediately to all new AI-generated content.
See AI Response Mode for details on what each mode changes.
AI Model
Choose the AI model used for all AI features (Chat, Receipt Scanning, Categorization, Insights, Stories, Goals). This directly affects response quality and AI quota usage:
| Model | Speed | Cost | Best For |
|---|---|---|---|
| ⚡ Fast | Fastest | ×0.75 quota | Quick categorization, simple queries |
| ⚖️ Balanced | Medium | ×1 quota | General use — the default |
| ✨ Quality | Slower | ×1.5 quota | Complex analysis, detailed insights |
Tip: With the Free plan (50 AI requests/month), switching to Fast gives you ~66.7 effective requests. Switching to Quality gives you ~33.3.
Tap a chip to change. The model takes effect immediately for all new AI requests.
Dashboard Widgets
Control which sections appear on your Dashboard. Tap the toggle next to each widget to show or hide it:
| Widget | Description |
|---|---|
| Gamification | Level, XP progress bar, and daily streak |
| Monthly Budget | Budget remaining with a color-coded progress bar |
| Income & Expenses | Combined card showing monthly income and expenses side by side |
| Debts & Loans | Summary of what you are owed and what you owe |
| Net Profit Chart | 6-month line chart of net profit (income − expenses) |
| Net Capital | Total net worth across all wallets |
| Fat Finder (AI Insights) | Monthly spending audit with savings opportunities |
| Calendar | Monthly calendar grid with income/expense dots |
| Goals | Top active savings goal with progress bar |
| Wallet Balances | Horizontal scroll of wallet balances by currency |
Tip: Your choices are saved automatically and persist across app restarts.
You can also drag the handle next to a widget to reorder it on the Dashboard, and tap Reset to default order to restore the original arrangement.
Notifications & Integrations
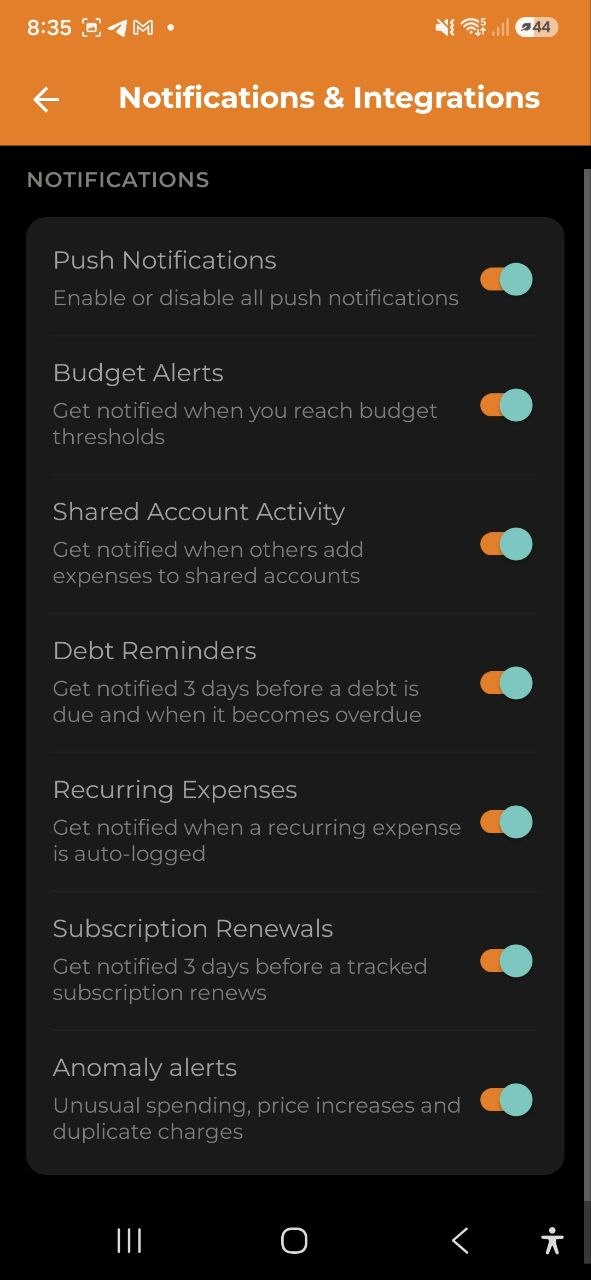
Notifications
Toggle switches for notification preferences:
| Setting | Description |
|---|---|
| Push Notifications | Master toggle — enable or disable all push notifications |
| Budget Alerts | Get notified when you reach budget thresholds |
| Shared Account Activity | Get notified when others add expenses to shared accounts |
| Debt Reminders | Get notified 3 days before a debt is due and when it becomes overdue |
Telegram Bot
Link your Telegram account to receive notifications and manage expenses via the Telegram bot. See Telegram Bot for details.
Security & Encryption
Set up end-to-end encryption (E2EE) to protect your financial data. See Encryption for details.
Categories
Access via Settings → Reference data → Categories.
View and manage all your expense and income categories in one place.
- All categories listed — both expense and income categories are shown together
- Delete a category — swipe left on a category or tap the delete icon to remove it
- Deletion is blocked if the category has any related expenses, incomes, or budgets — you must reassign or delete those records first
- System categories can also be deleted if they have no related records
Note: Deleting a category is permanent and cannot be undone.
Data & Reports
Data & Sync
- Last Synced — shows when your data was last synced with the server (e.g., “5 min ago” or “Never”)
- Sync Now — tap to manually trigger a data sync
Note: The app works offline. Your data saves to your device and automatically syncs when you’re back online. Use Sync Now to force an immediate sync.
Reports & Email
Manage your report and email preferences:
- Weekly Email Summary (Business) — toggle on/off, choose the day of week
- Monthly Digest Email (Pro+) — toggle on/off
- Generate Report — opens the Export & Reports screen
- Export Backup — creates a full JSON backup of your account data
- Restore Backup — import a previously exported backup file
About
- Version — current app version number
- Help — opens the in-app help center
- Support — send an email to the support team
- Privacy Policy — view the privacy policy
- Terms of Service — view the terms of service
Log Out
On the main Settings screen, tap Log Out at the bottom. A confirmation dialog will appear — confirm to sign out of your account.
FAQ
-
Q: I changed my language but some text is still in the old language. What do I do? A: The language change is instant for all interface elements. If you notice untranslated text, try restarting the app.
-
Q: How do I change my email? A: Go to Settings → Profile, tap the pencil icon next to your email, and follow the two-step verification flow. A 6-digit code is sent to your new address to confirm the change.
-
Q: What happens to my data when I log out? A: Your data remains stored on the server. When you log back in, everything will be restored. Local data on the device may be cleared.
See also: Accounts | Subscription Plans | Export & Reports | AI Response Mode | AI Chat